
Dress Room
Showing posts with label DIY. Show all posts
Showing posts with label DIY. Show all posts
Nov 29, 2010
Sep 3, 2010
Kim's home office
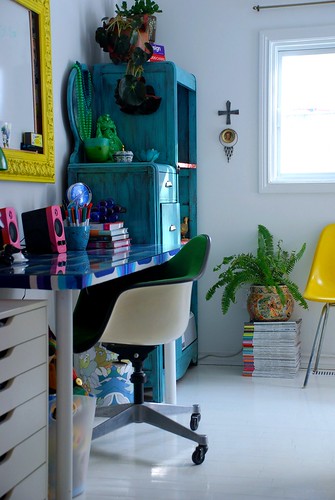
The desk is an Ikea table top wrapped in vintage retro fabric, and topped with a piece of glass (some photos were taken before the glass was bought). The inspiration board over my desk is made from some trim I found at Home Depot that I spray painted and made into a frame and I nailed a large piece of cork to the wall behind it.
The chair is a vintage Herman Miller Eames that came upholstered in green fabric, that I found at a local antique market for $160. The souvenir pillow cover I found on eBay. It is now in the trash, as Felix, gawd love him, peed all over it. The lamp I found at a local mid-century shop for $40.
Next is an armoire I spent alot of time reworking. I found it at a flea market in a town about an hour from here for $159. It was a darkish brown wood (see here), so I dry-brushed it with the teal paint I used in my dressing room. I removed the door and built shelves for the section that you would ordinarily hang clothes in.
I bought some vintage wrapping paper on Etsy and mod-podged it to the shelves. It stores my copier/scanner on the bottom shelf, and behind that is my modem/router and all that fun stuff hidden away. Everything you see is either from eBay, Etsy, local vintage shops and an Asian shop in the Byward Market.
Sep 2, 2010

May 29, 2010
White Family Room
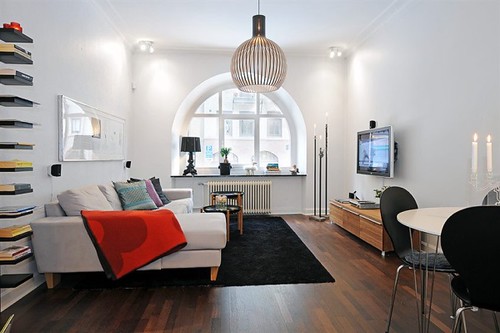
White living room with few furniture.
White sofa with black rug.
Low cabinet for entertainment unit.
DIY wallshelves.
Mar 3, 2010

Feb 12, 2010
Joyful Paper Silhouettes

Photographs: Jolie Ruben
You’ll need:
• Old photographs or a camera and printer to make new ones
• Black construction paper
• Scissors
• Tape
• An assortment of picture frames
Step-by-step:
1 Find a photograph of a loved one in an active pose. Maybe cousin Mark is running toward the camera, or niece Sarah is jumping on the bed? Or gather friends and stage new shots specifically for this project. The more dynamic the photo, the better.
2 Cut out the figure from the photograph.
3 Trace the figure onto black construction paper and cut it out.
4 Tape the new silhouette onto white paper and insert into frame.
5 Repeat the process and arrange the frames so that each silhouette seemingly interacts with the adjacent figures. Note how Sokoler’s silhouettes appear to be pulling each other from one frame to the next.
“I love the idea of keeping the kid alive inside of you,” says recent FIT graduate Katie Sokoler, as she kneels atop a roll of black paper almost twice her size. “All of my projects have a playtime theme, but this one is inspired by the scene in Peter Pan where he tries to sew his shadow back on.” Sokoler, who’s the official photographer for Improv Everywhere, is referring to her college thesis, the Shadow Project, a series of photographs featuring life-size shadows interacting with real people. “I put shadow cutouts on walls all over Brooklyn and waited for people’s feet to match up,” she explains. The Rockland, New York, native spent two weeks (six hours every day) lurking behind cars, waiting for the exact moment that passersby lined up with her art. “It was tough because I wanted the right kind of person—an old man looked better matched with a little boy shadow and a hurried lady looked better with a lighthearted girl cut-out.” Sokoler posted thesis samplings on her blog (colormekatie.blogspot.com) and was soon getting thousands of hits, including visitors from Germany and Turkey. Here, she shows us how to adapt shadows and make playful silhouette art that can be hung in your apartment.
Read more: http://newyork.timeout.com/articles/apartments/75532/how-to-paper-silhouette-art#ixzz0fHDK8fsq
Feb 11, 2010
DIY Graphic Wall Hanging

Name: Naseem
Location: Back Bay – Boston, Massachusetts
I have lived in this sunny one bedroom for about 16 months — it's my home and office (I am an architect) so it needs to function as a place that I can work in during the day and have friends visit over the weekend.
It had a lot of nice features to begin with — an eat-in kitchen with a window, hardwood floors, and two working fireplaces — but I have added some color while trying to keep the furniture and general atmosphere simple and uncluttered. I purchased almost all of the furniture from IKEA and my parents are in the oriental carpet business, so I took advantage of that connection and got a few nice carpets!
Thanks Naseem!
www.apartmenttherapy.com
Jan 30, 2010

Nov 8, 2009
Subscribe to:
Posts (Atom)